
In session one, ‘How Far with Little Coders’, students were investigating just how far is 5 and ten Ozobot steps? Once we had acquired this knowledge we could move forward and challenge ourselves. The challenge criteria is opened ended, the solution will be different for each group and students have choice in their design and construction process. So, what is the challenge?
Session Two
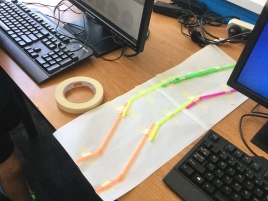
The challenge:
- Create a track for the Ozobot to travel, using graph paper, masking tape and straws.
- Calculate the distance to travel through each section of your track.
- Use the Ozoblockly editor to create a sequence to allow the Ozobot to travel the full length of your track, from start to finish!
Tips to Remember:
- Fold along one edge of the graph paper, match the folded edge on one sheet to the graph line on the second sheet. Tape together on the reverse side. *I did this for my students, under their guidance as to their design choice. Older students should be able to manage themselves.
- Cut the straws into different lengths to make an interesting track.
- Use small pieces of masking tape to hold down the straws, make sure the tape will not interfere with the travelling Ozobot.
- Make sure you allow enough width across the track, so the Ozobot can travel freely.
- Include degree codes to turn direction.
- Refer to your prior test results, how many graph squares/cm is in 5 or 10 Ozobot steps? How many code blocks do you need to use?
- Count the graph squares carefully to calculate which code block you need to use. Use a pencil to mark each code block distance on your track. Use this information to select the correct code blocks, and form your sequence.
- Test run along the way…calibrate the robot, then load the sequence.


Most students took two sessions to complete the task. The first student to finish was a girl! Go, coding girls! In my experience, across the 1-10 Years/Grades, girls do seem to have the stamina to persevere and problem solve, the boys will often give up and enthusiasm wanes when they can’t solve problems quickly. With this activity, everyone was engaged and kept trying to get to the finish line. There was cheers of joy, clapping and congratulations when students succeeded. There was also tears of frustration from one little man, who passionately wanted to do well, but struggled with his low math ability. A little pep talk, some teacher help and he was back on track.
When you select the student partner groups, pay attention to the student’s strengths, try and pair them so one supports the other. It will reduce the frustration and hopefully there will be no tears. The word challenge is very real in this activity, I am working with six and seven year old’s, and I am pushing them. Am I asking too much of them? Perhaps, but they are learning from the challenge, building stamina and developing thinking skills, plus finding pride and joy in the accomplishment. Oh, and celebrate the achievements, send them off to show others of what they can do…show the office staff, the principal, the gardener, the class next door, and spread the joy!
