
Welcome back.
If you remember from my last Little Coders post, I had promised to let you know how we went in the next two sessions. So, let’s talk about how I assessed the students in these sessions.
Session 4 (& 5). We started, as I always do, reviewing our past skills. A quick game of ‘Who knows this code?’, holding up the Ozobot code block flash cards (mode 1) and having students answer individually. Then we moved on to creating a sequence on the board with our text code cards, like before the students work with me making decisions on what we will include and what we need to complete the sequence (see session 3. for more info). 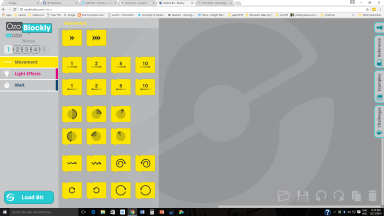
Then we had a go creating the code in the Ozoblockly editor, this was the easy part. Most students can now use the editor very successfully, a few make some simple errors, such as selecting a backwards code instead of a forwards code.
What is tricky is programming the Ozobots on the monitor, to test their sequence. A few tips to teach which are vital for success are:
- Train the students to check the display brightness, using the buttons on the monitor. It must be set at 100% or it will not load. We work in a computer lab which the whole school uses, and other students will change the settings.
- Train the student to calibrate the Ozobot before every program load. This is usually the number one reason for failure. You must: hold the button in on the Ozobot until it flashes white, release the button and then place on the screen, hold until it flashes green (yay, it’s working), then it will turn itself off. You are now ready to load the program.
- Train the student to load the program. They must turn the Ozobot on and release the button before placing it on the monitor. *Do not hold the button down. With the Ozobot turned on and held in place on the monitor, click the load button. The program will load; you know it is working if it is flashing green. *If it flashes red it is not working! Redo the calibration and try again.
- Train the the students how to run their program. They must learn to double click the button on the Ozobot to run their program. If they only click once it will not run their program.
 Next, I got my check list out to record what they could do, and I changed the text code sequence which was on the board. I added a few different codes and lengthened the sequence. The students were asked to create the sequence and I walked around marking off who could do what (the basics). As students finished loading their programs they called me over and demonstrated their sequence using the Ozobots. When we are watching the Ozobot, we are also looking at their code on the monitor and talking about what’s happening. This reinforces the connection of what is on the screen (the code) and what the robot is doing…is the robot flashing the right colour, has it moved forward or backward, is it turning in the right direction, etc? We actively look for any errors. We talk about the errors and I listen to what they say, what do they need to do? Can they identify, fix the error and modify the code independently? You can get a very clear picture of their knowledge. *Note: this is very time consuming, I did not get to view every student, and that is with having an extra staff member in the room to monitor the class and help students with any issues. I ended up assessing over two sessions (4 & 5), with help. Be easy on yourself and break it down into targeted groups for assessment over several classes.
What we are assessing? Basically, can the student…
- Use the hardware and software to meet specific objectives.
- Create a set of sequenced steps, using provided commands for a robotic device, to make them move in an intended manner.
Session 6. This time I make the task more challenging and creative. The students must use the provided basic codes but they have freedom of choice in designing their own sequence in any order they wish. They can add as many steps as they like, choose any colours they wish, make choices about direction (including degrees) and wait time, and light features. I place a selection of basic codes (using the text cards) on the board, and I 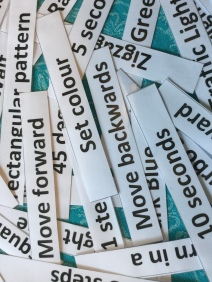 ask the students to create their own sequence using the codes. The text codes include: set colour, move forward, move backwards, turn right, turn left , wait, and turn in a (circle choice). I also write on the board that they must include four special lighting or movement codes of their choice (This makes it more fun, who doesn’t want Christmas tree lights flashing, before you zig zag along?). I also stipulate that they must have between ten and twenty code blocks within the sequence. They must then load the program onto the Ozobot, test the program and make any modifications, before showing the teacher.
Sounds fun, but where is the challenge? The challenges vary greatly depending on the student, their abilities, their choices and the criteria that you set. For instance:
- Can they log onto the computer?
- Can they find and open the software?
- Can they select mode 1?
- Can they create/design a sequence using the set codes? *Note: Students could draw/design a plan on paper to create a sequence, prior to them coding on the Ozoblockly editor.
- Can they identify and locate the code blocks they need?
- Can they track how many code blocks they have included? Have they used them all and met the criteria?
- Have they snapped/joined the code blocks together?
- Can they calibrate the robot?
- Can they load their program onto the robot?
- Can they run/test their program? Are they making links/connections between what code is on the screen and what the robot is doing?
- Can they problem solve when the robot does not run as it should? (Monitor brightness, calibration, loading procedure)
- Can they talk about their sequence, their code choices and what the robot is doing? *Note: You could have students draw their completed sequence and write what each code means after they complete the task.
Wow, I am exhausted just typing it!
Once again it boils down to our basic skills and knowledge goals: using hardware and software, reading and using a set criteria to create a sequence (algorithm), in order to get our robots moving in an intended manner.

 The new Evo has sensors which allow it to interact with objects in the environment, it has new lights, a speaker, can make sounds to suggest emotions and allows users to communicate through social media. You can use the Evo with tablets and smartphones. Much like our old favourite 2.0 Ozobot it can be programmed with either colour codes or block coding. New codes have been developed to match the new features, students will enjoy adding sound to their programming.

